Owl Punch from Stampin Up
Using the Stampin Up Owl Punch I made this Santa Owl based on a picture I had found online. It is so cute and a great addition to Christmas cards – especially for young children. If anyone wants directions on how to make this Santa Owl then leave a comment and I will post the instructions.
Here is an example of the Santa Owl used on a card.
When playing with the owl punch and making lots of owls and the Santa owl there was a revelation at my craft table when we took the wings of the bird punch to make the wings of the owl. When we looked at the wings they also looked like hair and thus Owlvis Hootley was born. This cute little owl heavily resembles Elvis Presley and when gold glitter is added is just too cute.
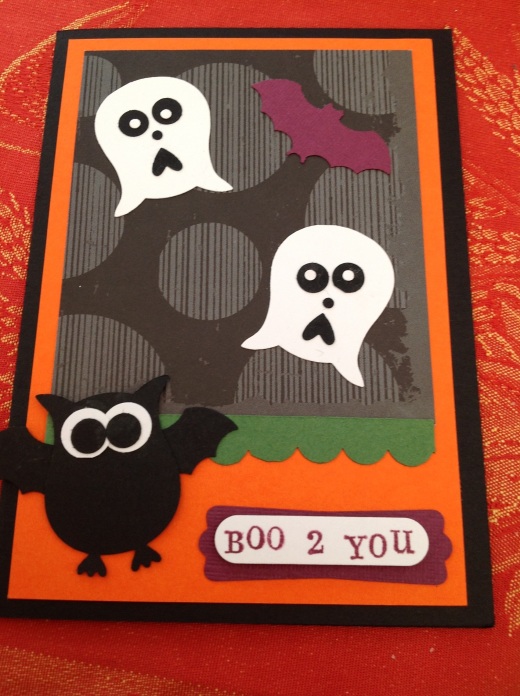
This card is made using the Owl Punch from Stampin Up in a few ways. The bat is made simply by punching out the body and the eyes and adding the wings from the Stampin up bat punch across the back of the owls body. The ghosts are also made using the owl punch. The feet of the owl are cut off and the body is turned upside down you add the eye pieces from the owl punch and the heart is used for the open mouth. It is so easy and looks sooooo cute. I’ve always loved the owl punch but lately I have decided it is the best punch from Stampin up as it is so versatile.
This Frankenstein owl is made with the Owl Punch – the bolts in the side of the head are the heart from the owl punch and the hair is the wing of the bird punch (ingenious)

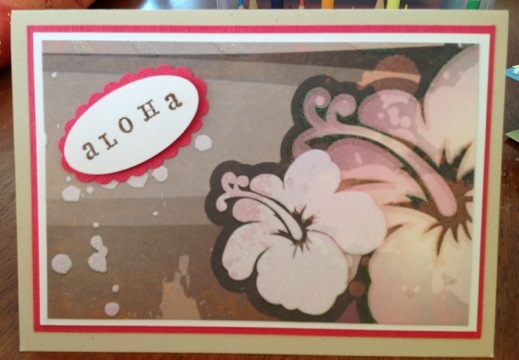
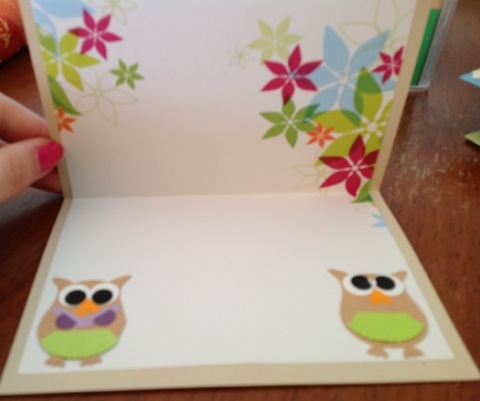
This is the front of the card which looks pretty plain but the inside is really cute …

The owls are hula owls !!!! I absolutely love them 🙂
Okay so as I finished making this card I wondered why I pay so much money for embellishments when making them is so easy!!! The doctor and nurse owl are made simply from the owl punch and a bit of cutting. the nurses hat is the bottom part of the owl’s tummy and two strips of red cardboard. The doctor’s stethoscope is made by cutting out an oval then adding an extra section of black card and attaching one of the circles from the owl punch’s eyes. So simple!!!
So I have made this monster using the owl punch and I have yet to make something with it … but I will. It’s great that you can make monsters with the owl punch as I’ve always struggled not to buy the making monsters stamp set from Stampin Up lol.


Hi Rebecca, can you send me the details of the Santa Owl, very cute..
Thanks,
Rene xo
how cute these two owls are…would like the directions for them…
Really enjoyed this blog.Thanks Again. Much obliged.
I just want to say I’m beginner to blogging and actually savored your web blog. Probably I’m likely to bookmark your blog post . You definitely have beneficial article content. Appreciate it for sharing your website.
great post
I like this post a good deal. I will surely be back. Hope that I is going to be able to read far more insightful posts then. Will probably be sharing your expertise with all of my associates! 683727
Very nice site. would like directions
Please email me the instructions for the santa owl. I love it!!!! Thank you in advance!
Please email me the instructions for the santa owl. Super cute!
Would love the instructions for the Santa owl.
would love directions for Santa owl ASAP for a bazaar. Thanks so much!
love Santa Owl, he is super gorgeous, can I please get a copy of the instructions?
Love Christmas owl!!
I love the owl punch santa. Would love the directions. Thank you for sharing
I love the Santa Owl could I get instructions on the Santa Owl. My daughters school is the owl. Her teacher would love it! Thank you!
Materials
1 x red body
1 x white body
1 x red triangle
1 x white strip
1 x small white circle
1 x white bag
1 x black strip
2 x white circles
2 x black circles
Process
1. Attach the black strip to the white body
2. Attach the white strip to the red triangle at the bottom to make the Santa hat
3. Attach the small white circle to the top of the triangle to make the Santa hat
4. Attach the body to the red outline
5. Attach the white circles to the red body
6. Attach the black circles to the white circles to make eyes
7. Attach the bag to the back of the red body as a sack
8. Attach the hat to the top of Santa
YOU HAVE MADE A SANTA OWL!